How-to: Custom components (properties)
For each property type, by default, a predefined visual component is used to display and edit the data. However, it is possible to override components with your own, created with JavaScript. This functionality is only supported in the web client.
Consider the task of creating a chat room for communication between users to demonstrate this capability.
Domain logic
First, let's create a domain logic in which the Message entity is defined. Each message contains plain text, as well as information about the author and sending time.
CLASS Message 'Message';

dateTime 'Time' = DATA DATETIME (Message);
text 'Text' = DATA TEXT (Message);

author = DATA CustomUser (Message);
nameAuthor 'Author' (Message m) = name(author(m));
own (Message m) = author(m) = currentUser();

replyTo = DATA Message (Message);
nameAuthorReplyTo (Message m) = nameAuthor(replyTo(m));
textReplyTo (Message m) = text(replyTo(m));
Message list display
The list of chat messages on the form will be displayed by a component written in JavaScript. Each message shows several values at once — the author, the time, the text, the quoted message — while a property component receives only the value of its own property. Therefore the message list is displayed by a custom object group component: all the needed properties are added to the form as usual, and the component receives their values by the names of the properties on the form. A property component will be needed below — for the input field of a new message.
Let's create the chat form. The keyword CUSTOM specifies that the message list is to be displayed using the chatMessages function, which will be written in JavaScript:
FORM chat 'Chat'
    OBJECTS msg = Message CUSTOM 'chatMessages' LAST
    PROPERTIES(msg) READONLY nameAuthor, dateTime, text, own, nameAuthorReplyTo, textReplyTo
;
Next, customize the form design by placing the message list in a new container with the identifier chat, and remove unnecessary components created automatically:
DESIGN chat {
    OBJECTS {
        NEW chat {
            fill = 1;
            MOVE GRID(msg);
            REMOVE BOX(msg);
        }
    }
    REMOVE TOOLBARBOX;
}
Add the form to the navigator:
NAVIGATOR {
    NEW chat;
}
Next, use JavaScript and CSS to create a component that will display messages in the browser.
The component will be created in the chat.js file, which will be located in the resources/web folder. This is the no-build path — a plain .js file, no JSX or bundling; see How-to: Custom client JS modules for where custom JS goes and for the with-build alternative. The controller these classic components receive is described in How-to: Custom view controller.
Inside the chat.js file, create the chatMessages function. It will return an object consisting of two functions: render and update.
The render function takes as input an element within which the new elements necessary to display the data should be created, as well as the controller. It creates and stores the container in which the messages will be displayed:
render: function (element, controller) {
    let messages = document.createElement("div");
    messages.classList.add("chat-messages");

    element.messages = messages;
    element.appendChild(messages);
}
To update the displayed values, the platform will call the update function each time, in which the same element will be passed, as in the render function, the controller, as well as the message list. Each list item contains the values of the properties added to the form in the fields named after these properties: nameAuthor, dateTime, text and so on. The function removes the previously created elements and creates its own element structure for each message in the list:
update: function (element, controller, list) {
    while (element.messages.lastElementChild) {
        element.messages.removeChild(element.messages.lastElementChild);
    }

    for (let item of list) {
        let message = document.createElement("div");
        message.classList.add("chat-message");
        if (item.own)
            message.classList.add("chat-message-own");
        if (controller.isCurrent(item))
            message.classList.add("chat-message-current");

        let header = document.createElement("div");
        header.classList.add("chat-header");

        let author = document.createElement("div");
        author.classList.add("chat-author");
        author.innerText = item.nameAuthor || '';
        header.appendChild(author);

        let replyAction = document.createElement("a");
        replyAction.classList.add("chat-reply-action");
        replyAction.appendChild(document.createTextNode("Reply"));
        header.appendChild(replyAction);

        message.appendChild(header);

        let replyContent = document.createElement("div");
        replyContent.classList.add("chat-reply-content");

        let replyAuthor = document.createElement("div");
        replyAuthor.classList.add("chat-reply-author");
        replyAuthor.innerText = item.nameAuthorReplyTo || '';
        replyContent.appendChild(replyAuthor);

        let replyText = document.createElement("div");
        replyText.classList.add("chat-reply-text");
        replyText.innerText = item.textReplyTo || '';
        replyContent.appendChild(replyText);

        message.appendChild(replyContent);

        let text = document.createElement("div");
        text.classList.add("chat-text");
        text.innerText = item.text || '';
        message.appendChild(text);

        let time = document.createElement("div");
        time.classList.add("chat-time");
        time.innerText = item.dateTime ? item.dateTime.toLocaleString() : '';
        message.appendChild(time);

        element.messages.appendChild(message);
    }

    let current = element.messages.querySelector(".chat-message-current");
    if (current)
        current.scrollIntoView({ block: "nearest" });
}
The property values arrive converted to JS values: the text ones as strings, own as a boolean, dateTime as a Date object, so the time is formatted by the browser.
The group's current message is determined by the isCurrent method of the controller and highlighted with the chat-message-current class; after the update it is scrolled into view.
The result will be the following element structure for each message:
<div class="chat-message chat-message-own">
   <div class="chat-header">
      <div class="chat-author">John Doe</div>
      <a class="chat-reply-action">Reply</a>
   </div>
   <div class="chat-reply-content">
      <div class="chat-reply-author"></div>
      <div class="chat-reply-text"></div>
   </div>
   <div class="chat-text">Hello world !</div>
   <div class="chat-time">10/5/2021, 3:28:05 PM</div>
</div>
Each element has its own class, which is used to design with CSS:
.chat-messages {
    display: flex;
    flex-direction: column;
}

.chat-message {
    margin: 6px;
    border: 1px solid;
    border-radius: 10px;
    padding: 6px;

    display: flex;
    flex-direction: column;
}

.chat-message-current {
    border-color: blue;
}

.chat-header {
    display: flex;
    align-content: stretch;
    justify-content: space-around;
}

.chat-author {
    font-weight: bold
}

.chat-reply-action {
    cursor: pointer;
    margin-left: 4px;
}

.chat-reply-content {
    border-left: 2px solid;
    padding-left: 4px;
    margin: 4px;
    border-color: blue;
    cursor: pointer;
    flex: 1;
}

.chat-reply-author {
    color: grey
}

.chat-reply-text {
    white-space: pre-wrap;
    max-height: 100px;
    overflow: clip;
}

.chat-text {
    white-space: pre-wrap;
}

.chat-message-own {
    background-color: lightblue;
    margin-left: 100px;
}

.chat-time {
    color: grey
}
To combine these two functions into one, a new function chatMessages is created, which returns them within the same object:
function chatMessages() {
    return {
        render: function (element, controller) {
            ...
        },
        update: function (element, controller, list) {
            ...
        }
    }
}
In order to load created js and css files when the page opens in the browser, you must add their initialization to the action onWebClientInit by adding the file name to the onWebClientInit(STRING) property. A numeric value is needed to specify the order of loading:
onWebClientInit() + {
    onWebClientInit('chat.js') <- 1;
    onWebClientInit('chat.css') <- 2;
}
The message displayed by the created component will look like this:

Handling user actions
In this example, we will handle two user actions for any of the messages: clicking on the quoted message and clicking on the Reply button. In the first case, the transition to the original message will be done, and in the second case - storing the message in local property and setting the focus in the input field of the new message.
Let's declare actions for them and add them to the form:
replyTo = DATA LOCAL Message ();

goToReply (Message m) { seek(replyTo(m)); } // go to the quoted message
reply (Message m) { replyTo() <- m; } // store the current message in a local property

EXTEND FORM chat
    PROPERTIES(msg) goToReply, reply
;
The controller parameter, passed to the update function, is used to execute these actions: its changeProperty method executes an action added to the form for the passed message. The handlers are added in the update function when the message elements are created:
replyAction.onclick = function(event) {
    controller.changeProperty('reply', item);
    $(this).closest("div[lsfusion-container='chat']").find(".chat-message-input-area").focus();
}

replyContent.onmousedown = function(event) {
    controller.changeProperty('goToReply', item);
}
Clicking on the Reply button also searches for the message input field using jQuery and sets the current focus to it. The DOM element with the class chat-message-input-area will be created later.
Send a new message
It remains to add to the form the ability for the user to create new messages.
First, let's create a send[] action that will create a new message in a separate session
based on the local message[] property and the previously defined replyTo[] property, and then clear them:
message = DATA LOCAL TEXT ();

send 'Send' () {
    NEWSESSION NESTED LOCAL {
        NEW m = Message {
            dateTime(m) <- currentDateTime();
            author(m) <- currentUser();
            replyTo(m) <- replyTo();
            text(m) <- message();
            seek(m);
            APPLY;
        }
    }
    message() <- NULL;
    replyTo() <- NULL;
}
The quoted message will be shown above the input field by ordinary form properties, and an action is declared to cancel the quoting:
replyAuthor 'Reply to' () = nameAuthor(replyTo());
replyText '' () = STRING(text(replyTo()));

removeReply 'Cancel reply' () { replyTo() <- NULL; }
The input field of a new message is a component of the message[] property: the platform passes the current property value into it, and the component returns the entered text through the controller.
Let's create the chatMessageInput function that will generate this component. For the input we will use the div element with the contentEditable attribute:
function chatMessageInput() {
    return {
        render: function (element, controller) {
            let text = document.createElement("div");
            text.classList.add("chat-message-input-area");
            text.contentEditable = "true";

            element.text = text;
            element.appendChild(text);
        },
        update: function (element, controller, value) {
            element.text.innerText = value || '';
        }
    }
}
The update function receives as the value parameter the value of the message[] property — a string, or null when the property is empty.
The CSS for the created element will look like this:
.chat-message-input-area {
    flex: 1;
    align-self: stretch;
    max-height: 300px;
    min-height: 90px;
    padding: 4px;
    overflow: auto;
}
As a result, the component will look like this:

Then we add event handlers that will send the message when CTRL+ENTER is pressed,
and write the entered message to the message[] property when the component loses focus.
The entered text is passed by the change method of the controller: it goes into the change handling of the message[] property in the same way as a value entered by the standard editor — for a data property that is writing the value into it.
The send[] action is executed by the changeProperty method of the form controller, available as controller.form; the requests are executed on the server in the order of the calls, so by the time send[] runs the entered text is already written to message[].
The handlers are added in the update function:
element.text.onkeydown = function(event) {
    if (event.keyCode == 10 || event.keyCode == 13)
        if (event.ctrlKey) {
            controller.change(element.text.innerText);
            controller.form.changeProperty('send');
        } else
            event.stopPropagation(); // stop further processing after pressing ENTER
}

element.text.onblur = function (event) {
    controller.change(element.text.innerText);
}
Add the input field and the quoted message to the form, as well as the Send button.
The keyword CUSTOM specifies that the value of the message[] property is to be displayed using the chatMessageInput function created earlier.
If an action is specified after the property with the keyword ON CHANGE, it is executed instead of the standard change handling, and the value passed by the change method is substituted for the user input in its value request:
EXTEND FORM chat
    PROPERTIES replyAuthor() READONLY SHOWIF replyTo(), replyText() READONLY SHOWIF replyTo(), removeReply() SHOWIF replyTo(),
               message() CUSTOM 'chatMessageInput',
               send()
;
Change the design of the form, so that the quoted message, the field for entering a message and the Send button are under the list of messages:
DESIGN chat {
    chat {
        NEW reply {
            horizontal = TRUE;
            MOVE PROPERTY(replyAuthor());
            MOVE PROPERTY(replyText());
            MOVE PROPERTY(removeReply());
        }
        NEW chatMessage {
            horizontal = TRUE;
            alignment = STRETCH;
            MOVE PROPERTY(message()) {
                fill = 1;
                autoSize = TRUE;
                width = 0;
                caption = '';
            }
            MOVE PROPERTY(send()) { fontSize = 32; alignment = STRETCH; }
        }
    }
}
By setting the autoSize and width attributes, the input component will stretch as the message size grows.
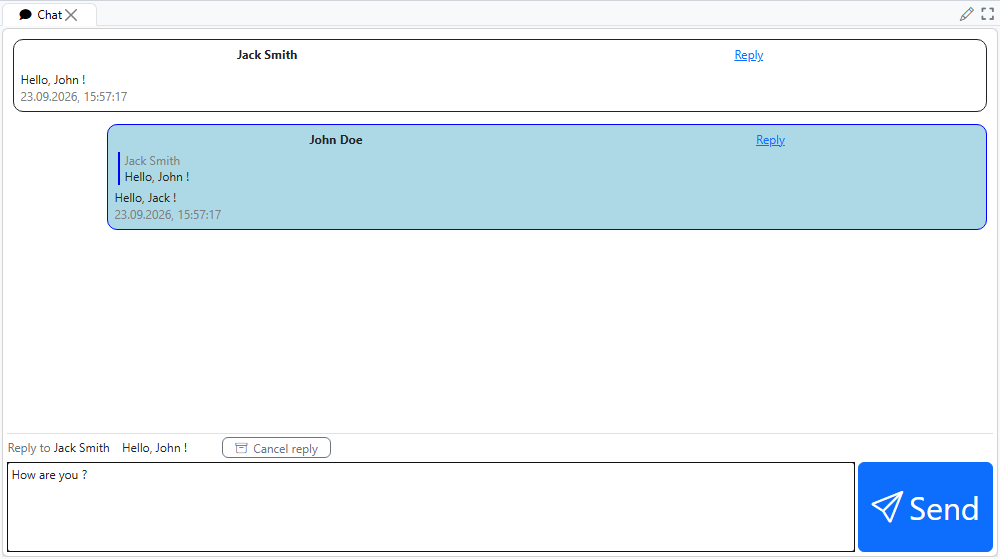
The final form will look like this:
Controller methods
The methods of the controller passed to the update function, internal helpers aside (optional arguments are bracketed):
| method | what it does |
|---|---|
change([value]) | pass a value change (see above); with no argument the change action is called without a value |
getValues(value, ok[, fail][, count]) | a server suggestion list for the typed value — the same suggestions as when the property is edited normally |
isReadOnly() | whether the property can be edited: null — editable, false — read-only, true — disabled |
diff(list, fnc[, noDiffObjects][, removeFirst]) | compute the changes of a value array — like the diff method in Custom components (objects); the items are matched by their objects field |
getColorThemeName() | the current color theme name: 'LIGHT' or 'DARK' |
form | the form controller |
The ok handler of getValues receives the result in the same format as the form controller's getPropertyValues. The render function and the optional clear function, invoked when the cell is cleared, receive a reduced controller as the second argument — of its methods, clearDiff() is the useful one, resetting the list remembered by diff.
Custom editor
By default the value is edited by the property's standard mechanism — a text input, for instance. The CHANGE keyword of the CUSTOM value view replaces or extends that mechanism with an editor of your own, written in JavaScript:
PROPERTIES(o) address CUSTOM CHANGE 'googleAutocomplete'
The editor function, like the display function, is registered as a wrapper and returns an object of several functions. The editor kind is determined by which rendering function that object contains:
| function | editor |
|---|---|
renderInput(element, controller, value) | extends the standard text input; element is that input itself |
renderDialog(element, controller, value) | a window editor |
render(element, controller, value) | an editor replacing the cell content |
value is the current property value converted to a JS value. Besides the rendering function, the object may contain:
getValue(element)— returns the value to commit; the string'canceled'cancels the edit. For an input editor, when this function is absent, the text of the input itself is taken.clear(element, cancel)— cleanup when the edit finishes;cancelis true on cancellation.onBrowserEvent(event, element)— handling browser events during the edit.
The editor controller provides:
| method | what it does |
|---|---|
commit([value]) | commit the edit: the passed value or, with no argument, the current one (from getValue or the input) |
cancel() | cancel the edit |
setDeferredCommitOnBlur(true) | defer the commit on focus loss — for picking from a suggestion list rendered outside element |
getColorThemeName() | the current color theme name |
form | the form controller |
The committed value goes through the property's ordinary change channel — the same way as a value entered by the standard editor.
For example, the built-in googleAutocomplete editor extends an address input with Google Maps suggestions:
function googleAutocomplete() {
    return {
        renderInput: (element, controller) => {
            // the suggestion list is rendered outside element, and picking from it ends with a focus loss,
            // so the commit on focus loss is deferred until the value is set
            controller.setDeferredCommitOnBlur(true);

            new google.maps.places.Autocomplete(element, { types: ['address'] });
        },
        clear: (element, cancel) => {
            // remove the suggestion list elements added to <body>
            $(".pac-container").remove();
        }
    };
}